
If you’re wondering how to set up bowling pins, you’re not alone. Many people don’t know the answer to this question, and even those who do often find it confusing.
The pins are set up in a triangular formation, with the two end pins being the same distance from the center pin. The pins are spaced so that there is an equal distance between them. So, allow me to explain the bowling pin setup in this article.
Table of Contents
What Should Be The Spacing Between Bowling Pins?
Spacing between bowling pins should be the same and create a triangular shape. And each side contains four rows. The Head of the triangular, also known as the “headpin,” is placed in front of the triangular. And one bowling pin should be 12 inches or 30.48 CM from each other.
The headpin (the front bowling pin) is what the bowler aims to hit. And that allows you to knock all the bowling pins behind if you can throw the ball perfectly. That is possible because of the triangular shape with the pins increasing in number from the headpin all the way to the back row.
The Head of the pin is called number one and then sets up bowling pin numbers from 1 to 10. And, it is easy to identify the pins and makes it easier to create the bowling pin layout. In addition, you need a pin setter for doing it precisely.
Take A Look Of The Dimensions Of Bowling Pins
Dimensions of the bowling pins are categorized in three different segments, such as A, B, and C., And; each segment ensures perfect spacing between the bowling pins. Therefore you can hit it with a bowling ball and strike!
Bowling pin layout dimension measured from center to center of the two pins. Take a look at this layout.
Segment A: Spacing Of Pins From One Another
It is the distance between one pin from its neighborhood pin. And that should be 12 inches or 30 CM. Also, every A segment creates its own triangular. But, if you create a perpendicular line in the triangular that divides it into two equal pieces, that should be 7 inches or 18CM.
Segment B: Pins In Front or Behind Another
This segment is created by measuring the distance between two pins that are aligned one behind others. From the numbering, 1 and 5, 2 and 8, 3 and 9 are examples of segment B. And the distance is 20.75 inches or 52.7 CM. These distances are also called sleeper pins.
Segment C: Side of Pin Deck
It is the distance of each side of the layout. For example, number 1 to number 10 distance. And that is 36 inches or 91CM.
Splitting into three segments assures you of perfect spacing between the bowling pins, and you can do that by a bowling pin deck.
Must Read: How Much Does a Bowling Ball Cost?
Know The Bowling Pins Spacing – Pin to Pin
As you know, the basics of bowling pins spacing that I have mentioned above. It is time to dive into the pin-to-pin spacing details.
Spacing Of Each Pin
The spacing of each pin is 12 inches or 30 CM that spreads in a triangular shape. Having even spacing ensures a perfect hit and knocks down the bowling pins easily.
Pin 1 to Pin 10
Pin 1 is the headpin that is located in front of the layout. And Pin 10 is located in the last row on the right side. And, spacing of pin 1 to pin 10 is 36 inches or 91 CM. This is the longest distance between two bowling pins in a deck.
Pin 1 to Pin 7
It is also the longest distance. However, Pin 7 is located on the left side of the last row. Therefore pin 1 to pin seven spacing is also 36 inches or 91 CM.
Pin 7 to Pin 10
Well, both bowling pins are located in the last row. And the spacing between them is similar to the previous, which is 36 inches or 91 CM.
Pin 1 to Pin 5
This is the alignment pin, and spacing between pin 1 to pin 5 is 20.75 inches or 52.7 CM. Pin 5 aligned right behind the headpin (Pin 1).
Pin 2 to Pin 8
Pin 2 is located on the left side of the second row, and pin 8 is perfectly aligned with pin 2 and located in the last row. And the spacing between them is also 20.75 inches or 52.7 CM.
Pin 3 to Pin 9
Pin 3 is located on the right side of the second row, and pin 9 is perfectly aligned with pin 3 and located in the last row. And, spacing is the same 20.75 inches or 52.7 CM.
Know The Arrangement Set Up Of The Bowling Pins
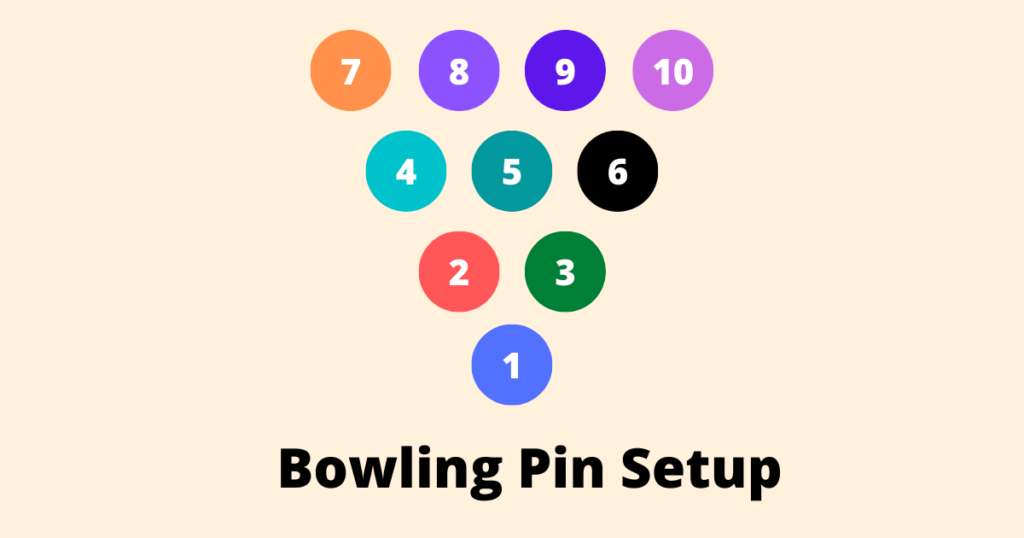
You already know the bowling pin spacing. And the layout looks like the following image.

So, let’s know the arrangement between each bowling pin.
- There will be only one pin at the first row, called a headpin, and it is the number 1 pin.
- Then there will be two pins in the second row. They will create a triangle with a perfect spacing which is 12 inches.
- After that, there will be 4,5,6 number pins behind the second row with perfect spacing. Make Sure the headpin and number 5 pin’s spacing should be 20.75 inches.
- And, in the last row, there will be four pins: 7,8,9,10. And the distance between each pin will be the same. Also, make sure segments C and B distance are correct, as I mentioned above.
However, a bowling pin deck arranges all the bowling pins perfectly with the proper spacing.
Numbering Of The Bowling Pins
It is not rocket science. There are ten bowling pins, and each has an individual number from one to ten. And, bowling pin numbers help to understand which one you knocked and the remaining standing pins.
So, the first pin, also known as the headpin, is the number 1 pin where bowlers usually hit the ball. And then sequentially arrange all the ten pins in four rows. You know the arrangement already. Here number 1 is the first pin, and number 10 is the last pin.
Some terminologies You Should Know.
There are some terms that are related to bowling pins. If you are enthusiastic about bowling, you have to know these terminologies.
- Head Pin
This is the number 1 pin located in the front row, and you have to hit in this head pin to get a perfect strike. It is only possible when your bowling is perfect.
- Pin rack
It is used to perfectly space a triangular setup and then places that to the pin deck.
- Pin Deck
This deck is an alignment system for bowling pins. And, it is a place where you have to place the pins in the bowling lane.
- Pin Setter
It is an automatic machine to set the pin in the bowling lane.
- Pin Elevator
It is used to pull the pins and store them to reuse later.
- Pin spot
A circular spot/place where you will place the pins in the bowling lane is called a pin spot.
- Pin Storage
After finishing the game, where you will store all the bowling pins for safety, and it is a combination of a few pin racks.
- Pin Turret
It is a unique storage system that is only used for Brunswick’s A-series ten-pin bowling pins.
Conclusion
So, that was all about the bowling pin setup. And, without having proper spacing and layout, it is impossible to score better. If the spacing is too far, there will be no chance to knock the next bowling pin or hit the strike. Also, if the spacing is too close, it will create a jam, and there is a chance of a quick knockout. Therefore, the bowling pin setup should be perfect, and spacing should be even.
Frequently Asked Questions
Why do bowling pins have a hole in the bottom?
It is for detecting the center of the pin for the coating process. Also, it helps to reduce weight.
What is the functionality of Pinsetter?
Pinsetter is an automatic mechanism to place all the bowling pins in the bowling lane on the pin spot.
How many feet from the foul line are bowling pins set?
In 10-pin bowling, the foul line is 60 feet from the headpin.
What shape do pins make when they are setup?
It makes a triangular shape with even space between each bowling pin.

